Multiform In The JS Help Desk!
How The Multiform Works
The Multi-Form Ticket feature in your help desk plugin allows you to create multiple customized ticket forms tailored to different types of issues or departments. Instead of using a single generic form for all tickets, this functionality gives you the flexibility to design unique forms based on specific requirements, improving both user experience and support efficiency. For example, you might have one form for “Technical Support,” another for “Billing Issues,” and a third for “Product Feedback,” each form with its own relevant fields.
Each form can include different input types such as drop-downs, text areas, file uploads, radio buttons, and checkboxes, depending on the kind of information needed. For instance, a Billing Issue Form might ask for an invoice number, payment method, and refund reason, while a Technical Support Form might require a device model, operating system, and error screenshot. This ensures users are only shown fields relevant to their ticket forms. When a user selects a particular ticket form (e.g., “Customer Support”), the associated department is automatically selected.
Multiform
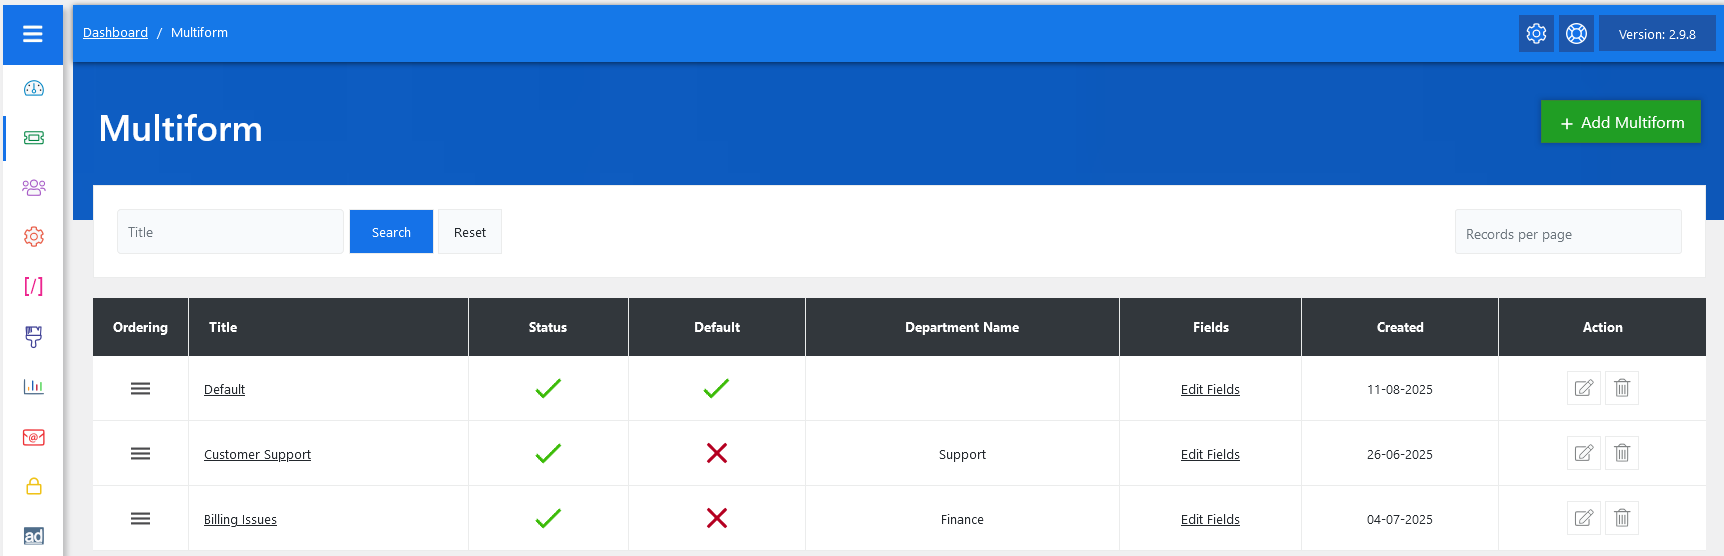
From your admin dashboard, navigate to the Admin Dashboard > Dashboard Menu > Multiform. On the multiform page, you will find various options for the admin to manage the multiform. This is the multiform listing page for the admin. All the multiforms will be displayed here, which are created by the admin and agents.
Search

Admin can filter multiforms based on title. When a filter is applied, only multiforms that meet the specified criteria are displayed. The reset button will disable the criteria and show all multiforms.
Listing

Display the list of how many multiforms are added. Admin also views the multiform title, status, default, Department name, fields, created, and action of the multiforms. Admin can also edit and delete the multiforms.
Key features include:
- Title: Title of the Multiform.
- Publish Status: Controls the visibility of Multiform in the pop-up.
- Default: Specifies which Multiform is selected by default when the page loads.
- Department Name: The department name that is assigned to ticket forms.
- Fields: A link to edit custom fields for that form, allowing tailored data collection per form type.
- Created: Created date of ticket form.
- Actions: Admin can edit and delete the ticket form by using these action buttons.
- Ordering: Determines the sequence of ticket forms in the pop-up.
Additionally, there’s an option to “Add Multiform at the top right of the Multiform page.
Change Fields Ordering
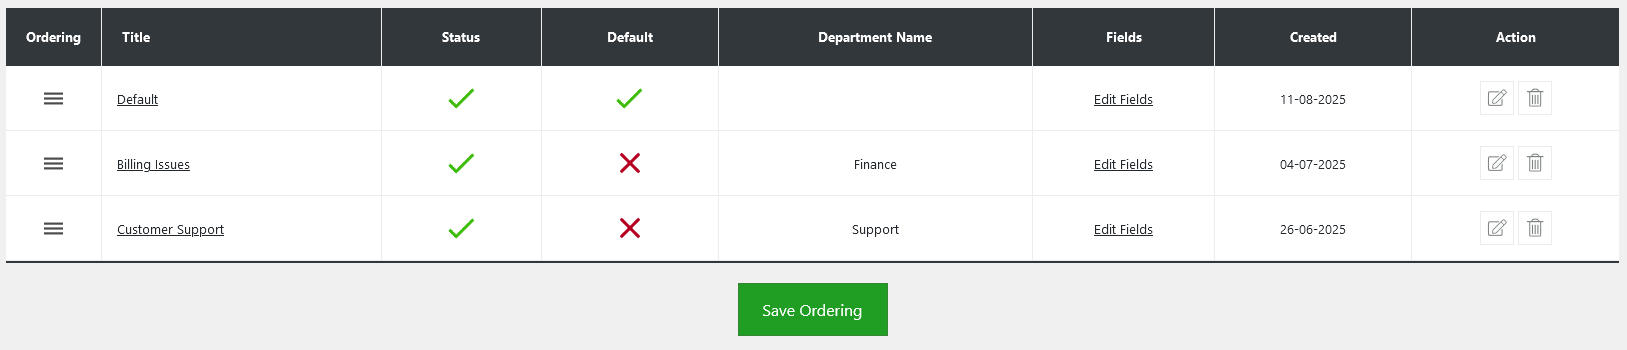
You can also adjust the order of your multiforms on the ticket form page, determining the sequence in which multiforms appear in the pop-up. After modifying the field order and saving the changes, the ticket form will reflect your preferred ordering.
Fields
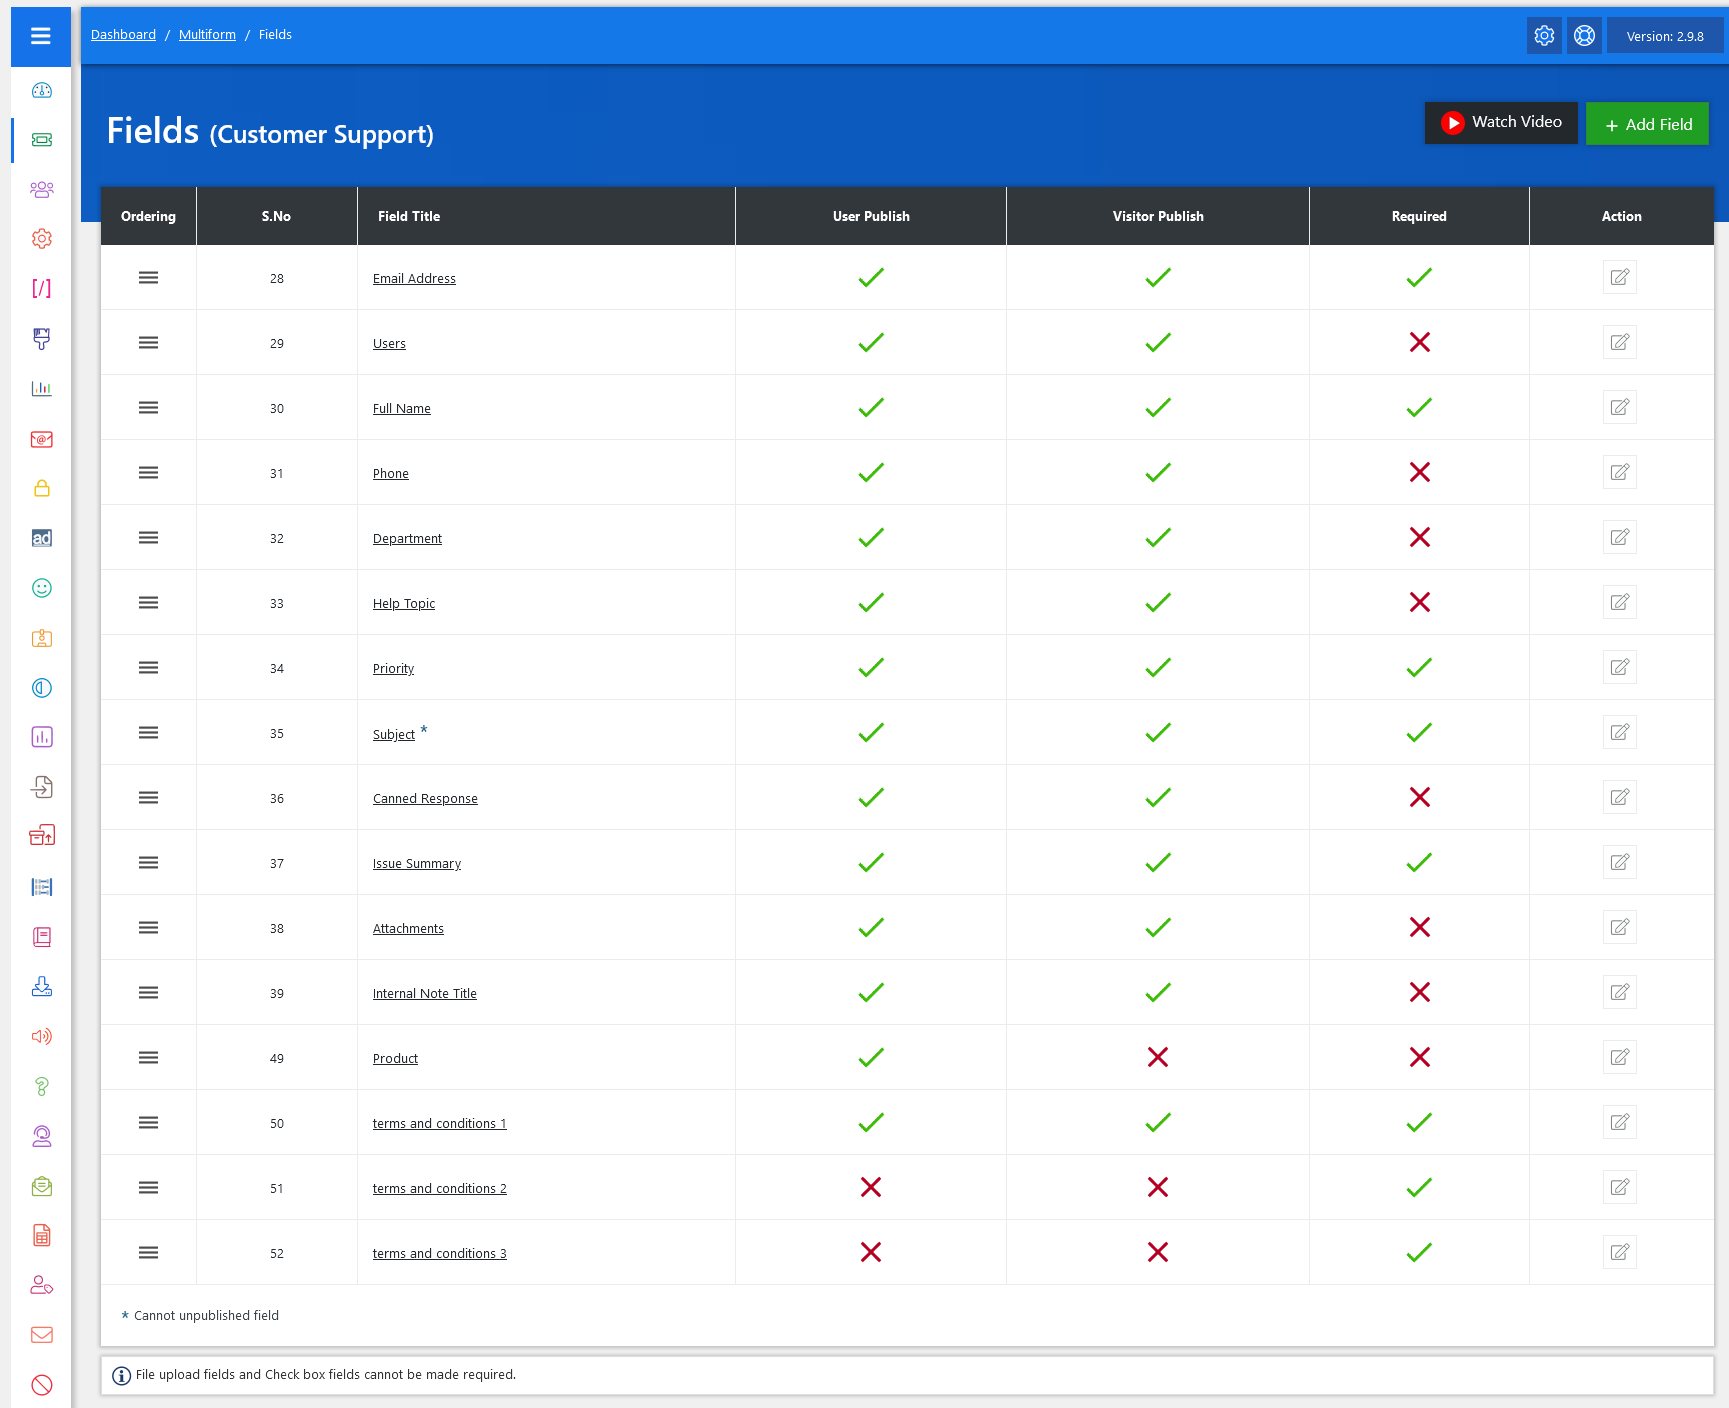
On the multiform listing page, there is an option that the admin can use to manage fields for each ticket form separately. Click on the edit fields link, and you will be redirected to the fields management screen.
Here, you can manage existing fields and add new ones to collect specific details about the ticket form. To add a new field, simply click on “Add Field.” This functionality allows you to customize the ticket form according to your requirements.
From the field management screen, you have complete control over how fields are managed and displayed on your ticket form. By selecting any field, you can adjust its visibility and publishing status for users and visitors alike. You can also set whether a field is required or not. Additionally, you have the flexibility to edit or delete fields as needed, ensuring your customization matches your evolving needs.
- Ordering: Adjust the order of your multiform fields on the ticket form page.
- Field Title: Name for your custom field.
- User Publish: Controls the visibility of fields in the ticket listing and ticket form page on the user side.
- Visitor Publish: Controls the visibility of fields in the ticket listing and ticket form page on the visitor side.
- Required: This option controls whether to make this field required or not.
- Edit/Delete: Admin can edit and delete the field by using these action buttons.
Ordering

You can rearrange the order of your custom fields on the ticket form, deciding where you want to show these fields. Once you change the field order and save it, the fields on the ticket form will align with your preferences. And that’s it! By following these comprehensive steps, you can customize your ticket forms with additional fields to suit your needs.
Add Field
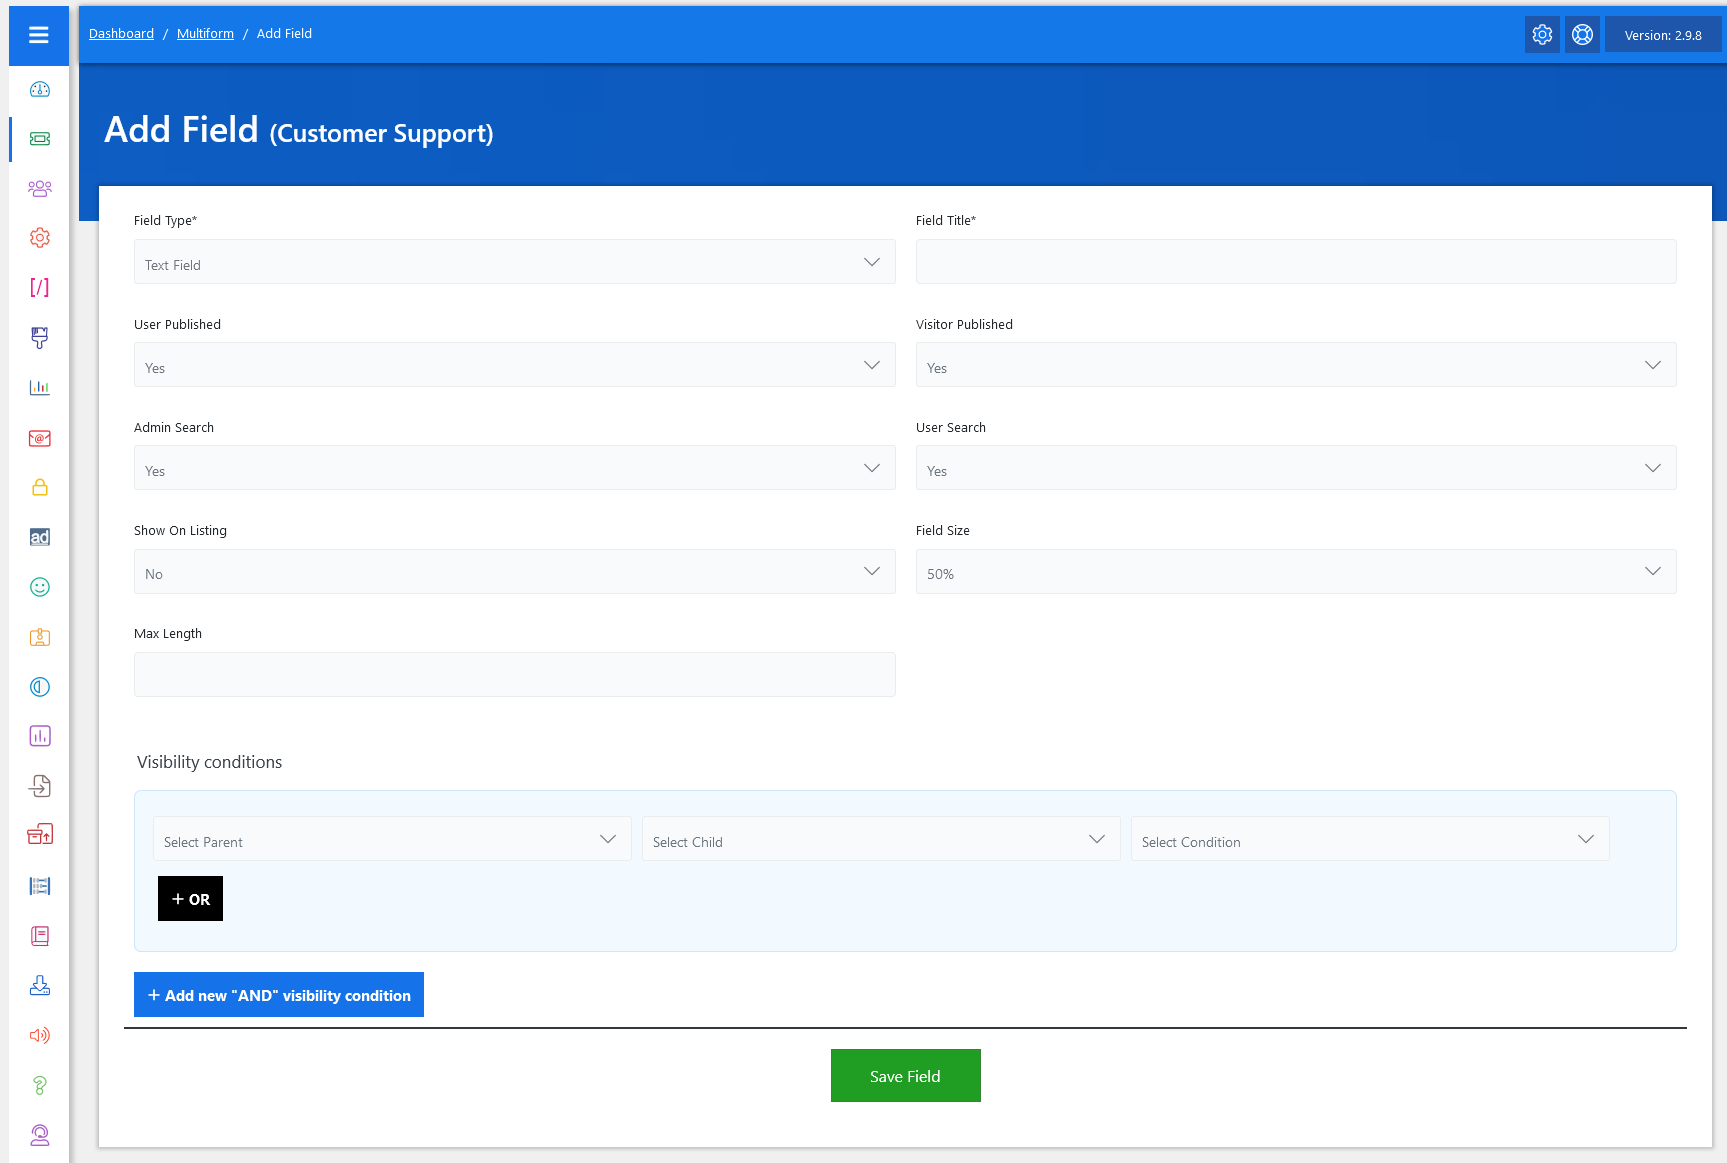
On the Add Field screen, follow these steps to create a custom field for the specific ticket form:
- Select Field Type: Choose the appropriate field type from the options available in the JS Help Desk. Options may include text input, dropdown, checkbox, etc., depending on what information you need to collect.
- Field Title: Enter a descriptive name for your custom field to indicate its purpose.
- User Published: Choose whether this field should be displayed alongside ticket details in the ticket listing.
- Visitor Published: Controls the visibility of fields in the ticket listing and ticket form page on the visitor side.
- Admin Search: Select “Yes” if you want this field to be searchable, allowing the admin to filter ticket searches based on this field.
- User Search: Select “Yes” if you want this field to be searchable, allowing the user to filter ticket searches based on this field.
- Show On Listing: YES/NO controls the visibility of fields on the ticket listing page.
- Field Size: Set the field size from the dropdown “50% or 100%”.
- Max Length: Set the max length of the field.
Visibility Conditions
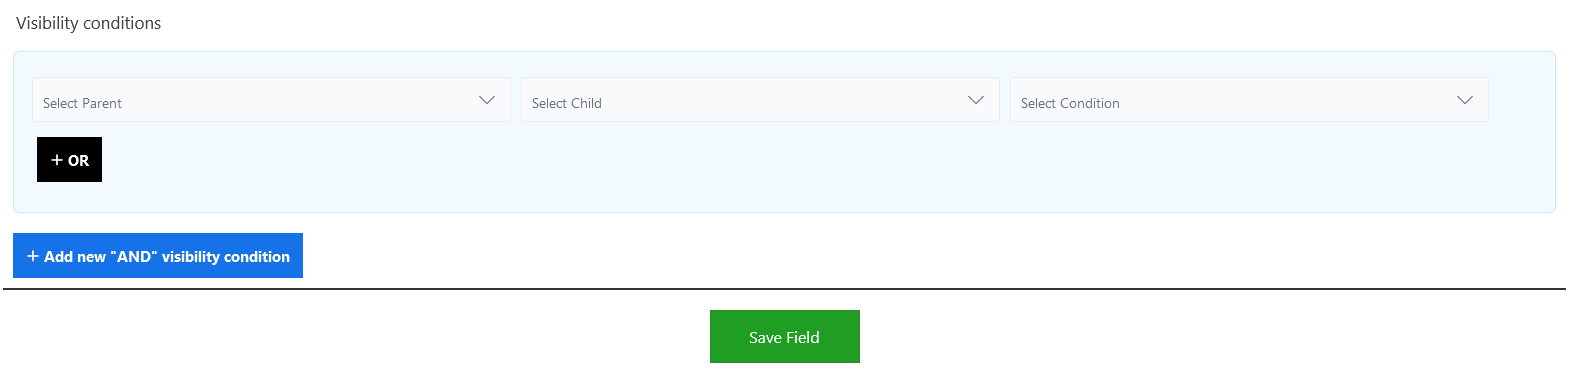
To add a child field with visibility conditions linked to a parent field, follow these steps:
Set Up Visibility Conditions:
- Parent Field: In the visibility condition settings, select the previously added dropdown field as the parent field.
- Child Field: Choose one of the values from the dropdown field that will determine the visibility of the multi-select field.
- Condition: Set the condition to “equal”. This means the multi-select field will only be visible on the ticket form when the parent field is set to “YES”.
The visibility condition interface is divided into two logical groups:
- OR Conditions
- AND Conditions
-
In OR logic, the field becomes visible if any of the listed conditions are met.
-
In AND logic, the field becomes visible only if all of the listed conditions are met simultaneously.
Working With OR Conditions

You’ll find the OR condition block. You can add multiple condition sets here. Each row lets you select:
-
A Parent Field (e.g., “Department”)
-
A Child Field (e.g., “Issue Type”)
-
A Condition (e.g., “is equal to”, “contains”, “is not”, etc.)
Adding Multiple OR Conditions
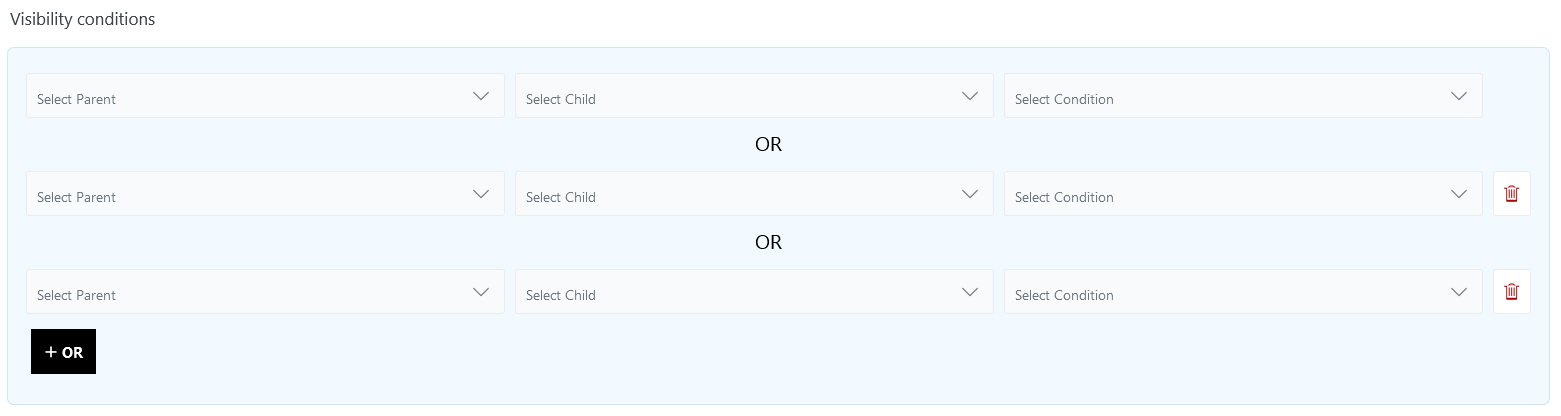 You can easily add more OR rules using the “+ OR” button. Each added rule increases the chances of the field being shown, as only one needs to match. You can also delete individual OR conditions using the trash icon.
Working With AND Conditions
The AND section works slightly differently. It lets you group multiple conditions that must all be true at the same time for the field to become visible. This is ideal when a narrower combination is required to show a field.
Adding AND Groups
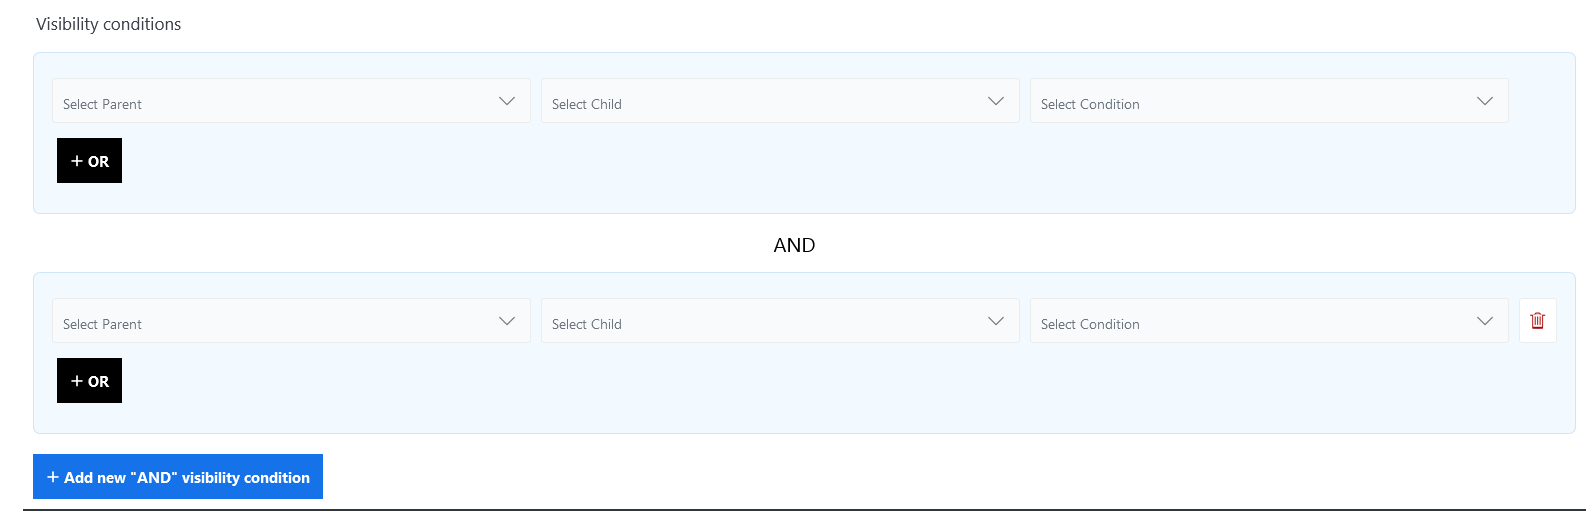
You can add a new AND group using the “+ Add new ‘AND’ visibility condition” button. Each group is evaluated as a separate condition set that must be satisfied for the field to be shown. This gives you fine-grained control over when each field appears on the form.
Save Field: After configuring the visibility condition and ensuring everything is set up correctly, click the Save Field button.