What can we help you with?
Export Ticket In The JS Help Desk!
Export Ticket
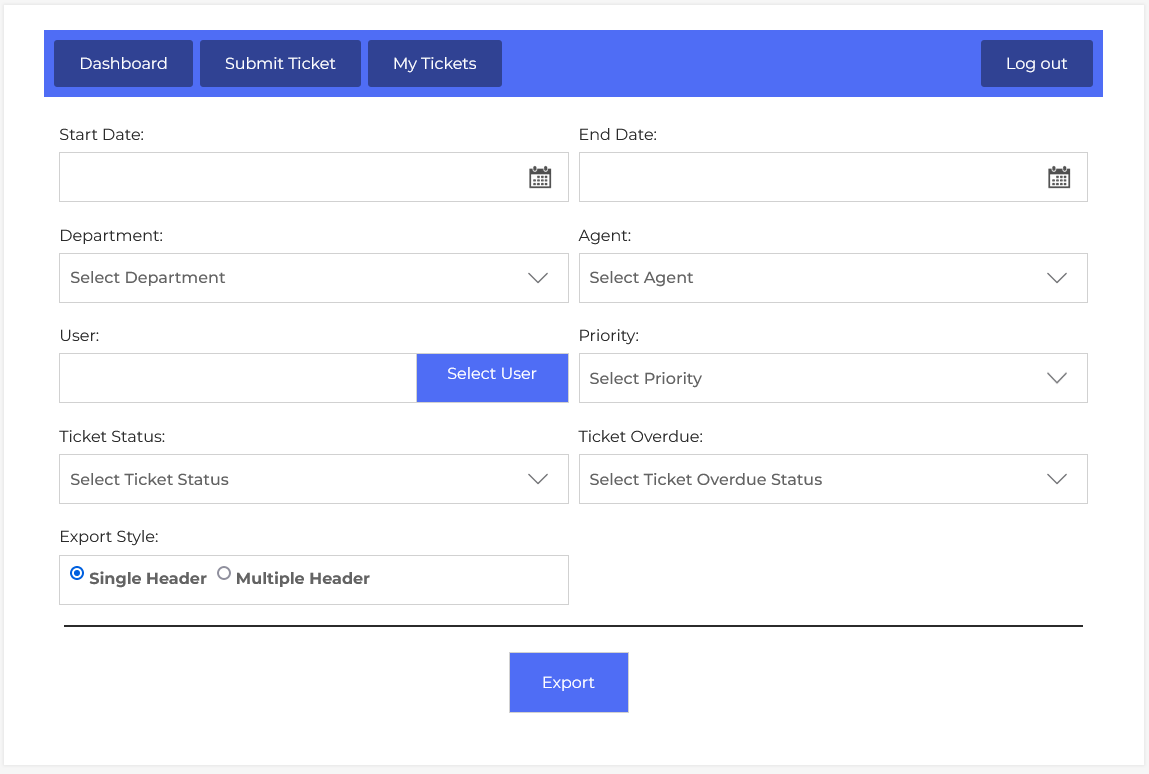
From your agent dashboard, navigate to Agent Dashboard > Dashboard Menu > Export Ticket. On the export ticket page, you will find various options for the agent to manage the export.
In JS Help Desk, the Export feature enables agents to extract filtered ticket data for reporting, analysis, backup, or offline access. The export interface is designed to be user-friendly, offering multiple filters to narrow down the dataset exactly to your needs.
- Start and End Date: At the top of the export screen, users can specify a Start Date and End Date to filter tickets created or updated within a specific timeframe. This is particularly useful for generating monthly, quarterly, or annual support reports. For example, if you want to review tickets, you can set the range from April 1st to June 30th. Only the tickets that fall within this range will be included in the export, allowing precise data segmentation.
- Department: The Department filters allow you to narrow the export results based on your team structure. You may want to export only the tickets handled by the “Billing” department. For example, selecting “Billing” in the Department field will export only the tickets under the Billing department. This helps agents assess the performance of different departments.
- Agent: The Agent filters allow you to narrow the export results based on your team structure. You may want to export only the tickets of a specific agent. For example, selecting “Sarah Jones” in the Agent dropdown will export only the tickets assigned to Sarah. This helps managers assess how different agents are performing.
- User: You can also filter by User, which lets you focus the export on tickets submitted by a specific end-user. By clicking the “Select User” button, you can search for and choose a particular user. This is ideal for handling audits or complaints where a complete history of a single user’s support activity is required.
- Priority: The Priority filters allow you to narrow the export results based on your team structure. You may want to export only the “High Priority” tickets. For example, selecting “High” in the Priority field will export only the tickets with a priority level of “High Priority”. You can also select the other ticket priority, such as “Low, Normal, High, Urgent” from the priority field.
- Ticket Status: The Ticket Status filters allow you to narrow the export results. You may want to export only the “Open” tickets. For Example, selecting “Open” from the ticket status field will export only the “Open” tickets. Similarly, choosing a “New, Waiting Reply, In Progress, Replied, Closed ” or “Closed Due to Merge” status, you can also generate reports on these ticket statuses.
- Ticket Overdue: Another helpful filter is Ticket Overdue Status, which allows exporting tickets based on whether they have breached response or resolution deadlines. This feature lets you pull out all overdue tickets so that trends can be analysed and preventive measures can be taken.
- Export Style: The Export Style setting offers two modes: Single Header and Multiple Header.
- Single Header: A Single Header format includes one set of column headers at the top and is ideal for spreadsheet use in Excel Sheets.
- Multiple Header: On the other hand, the Multiple Header format may be used for grouped exports where each section is separated by headers, useful for printing or structured offline archiving.
Once all filters are applied, clicking the green Export button at the bottom will generate a downloadable file, typically in .XLS format.