Ticket Detail In The JS Help Desk!
Ticket Detail
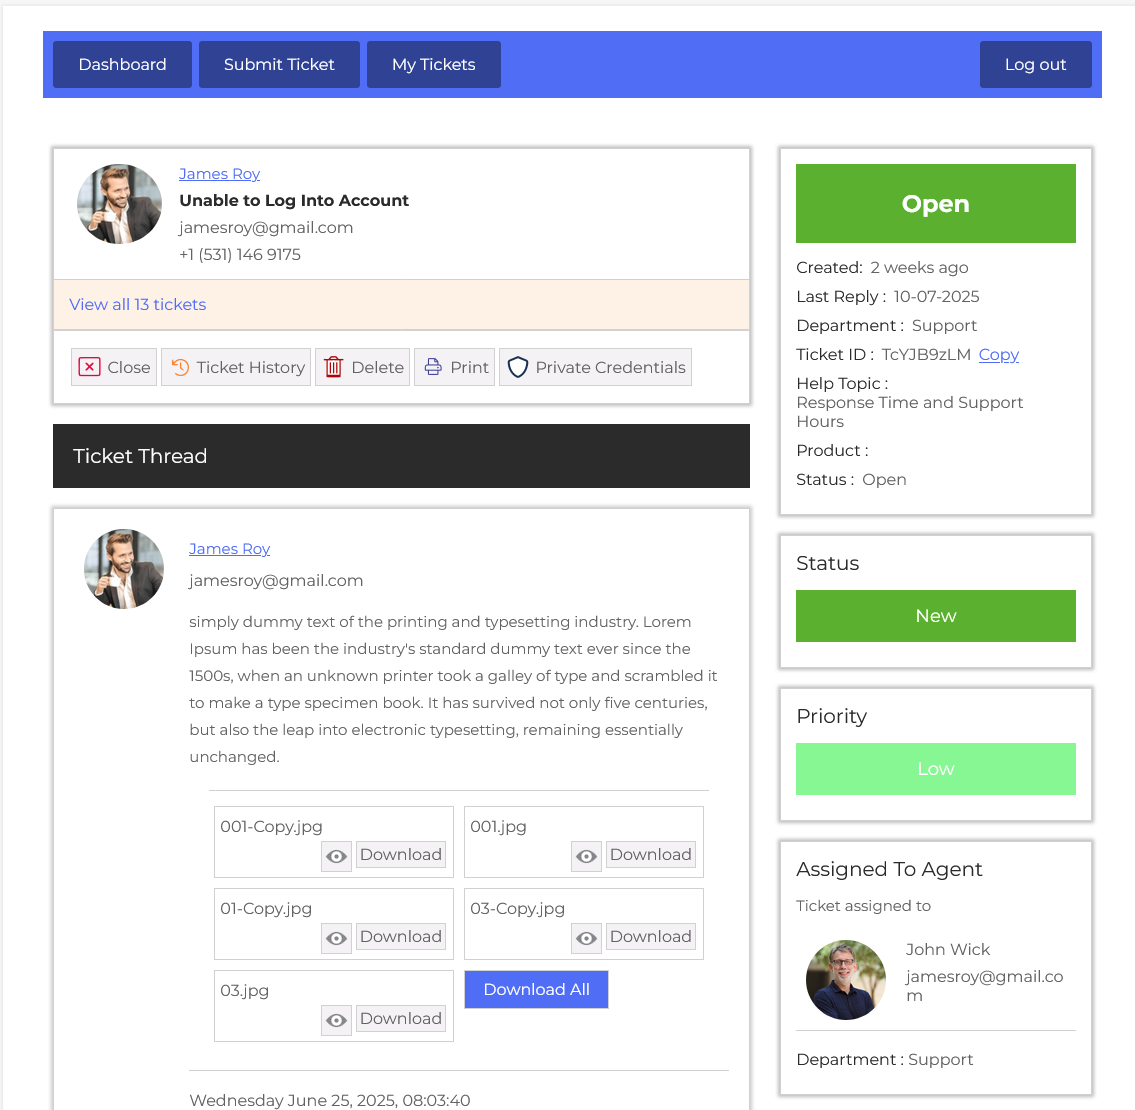
From your user dashboard, navigate to User Dashboard > Dashboard Menu > My Tickets. To view the ticket detail page, click on the ticket subject. This page provides us with details about a ticket. All the attributes (Fields) of a ticket are shown here.
Ticket Actions

There are multiple action buttons, including Close Ticket History, Delete, Print Ticket, and Private Credentials. These allow the user to take quick actions depending on the ticket’s current state. First, we talk about the Closed Ticket.
Close Ticket
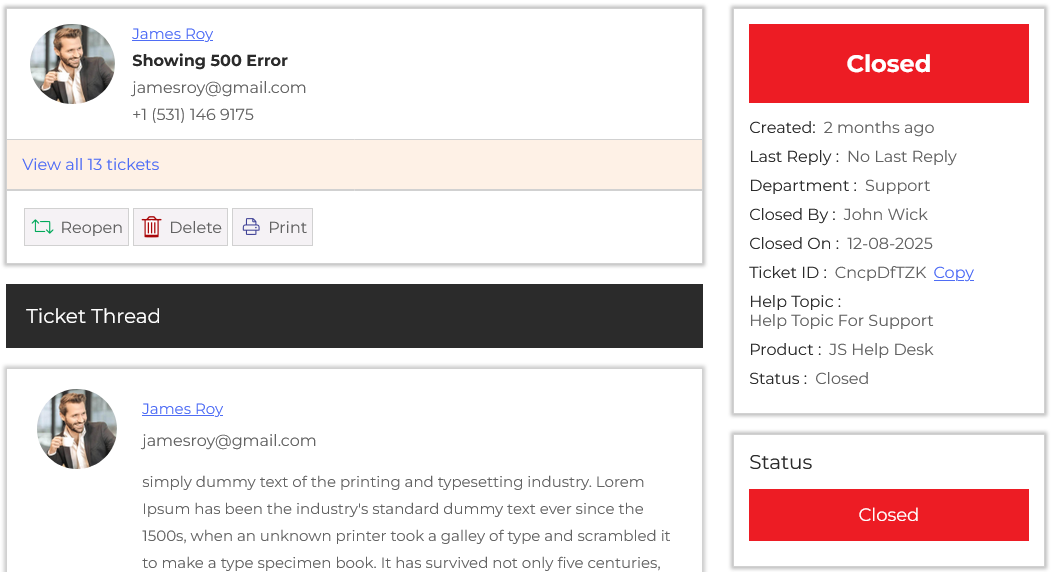
The user can manually close a ticket at any time. The Close Ticket feature in your help desk plugin allows you to mark a ticket as resolved once an issue has been successfully solved. This action moves the ticket out of the active support queue. When a ticket is closed, its status is updated in the system and is typically locked for further replies from the user. When the ticket is closed, some actions disappear from the closed ticket. However, help desk systems also offer a “Reopen” option, allowing users to reopen a ticket, and the user can take actions on the ticket.
Ticket History
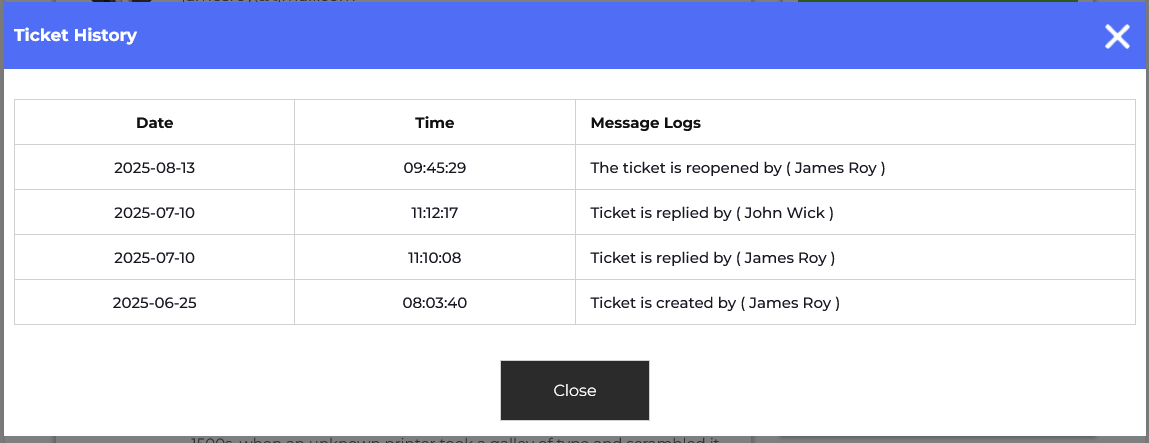
The Ticket History feature in your help desk plugin provides a complete chronological record of all interactions, updates, and actions related to a support ticket. Every time a reply is added, the status is changed, or an action is taken, it is logged in the ticket history. The ticket history pop-up has the action date, time, ticket action, and the action is taken by.
This video link is about Ticket History.
Delete
The user can delete the ticket by clicking on the delete button. The reference of a ticket will remain the same, but the ticket will be deleted.
Print Ticket
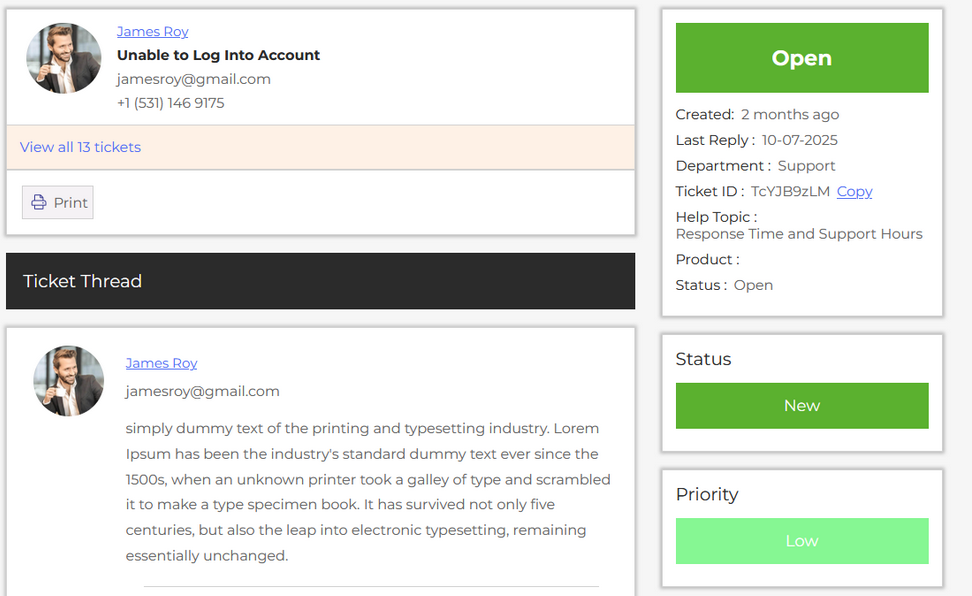
The Print Ticket feature in your help desk plugin allows the user to generate a printer-friendly version of a support ticket for record-keeping, sharing, or offline use. This feature is especially useful for teams that require a physical copy of customer interactions for compliance, audits, internal reviews, or documentation. With just one click, the user can print a ticket.
Private Credentials
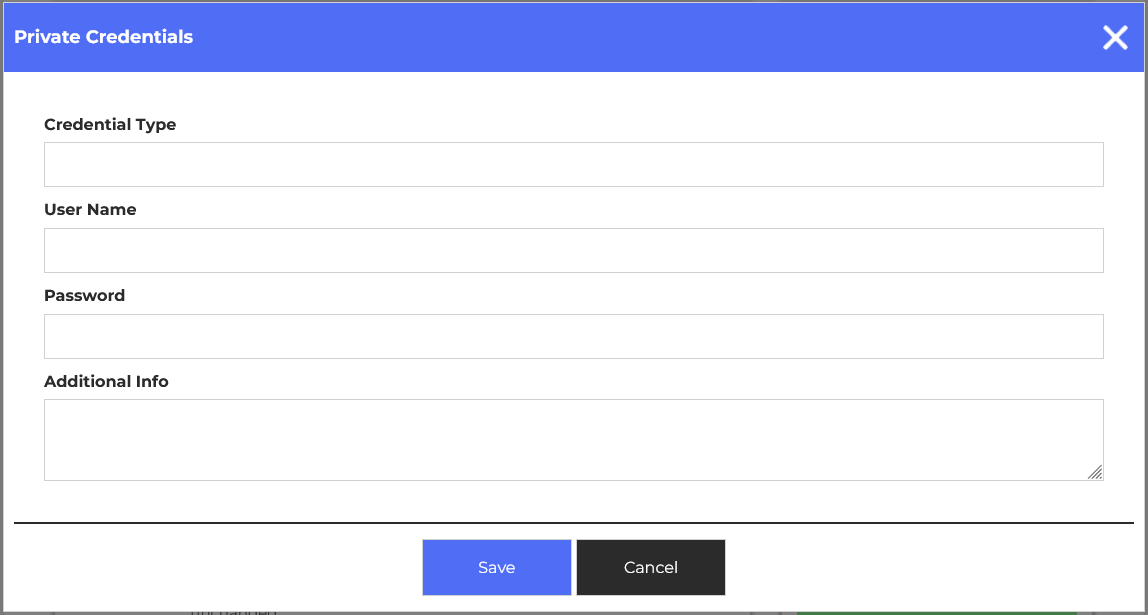
The Private Credentials feature in your help desk plugin allows the user to securely share sensitive information, such as passwords or login details, without exposing them in public replies. This feature ensures that confidential data is kept secure and only visible to authorized personnel. For example, if a customer is facing issues accessing a premium tool and needs to share their login credentials, they can submit them using the private credentials field instead of typing them into the regular message box.
When the user clicks on the private credentials button, a pop-up will appear on the screen. Fill the fields and click on the save button. Your credentials have been successfully saved.
- Credentials Type: Enter the credentials type in the text field.
- Username: Enter the username.
- Password: Enter the password.
- Additional Information: Enter the additional information related to the credentials.
This video link is about Private Credentials.
Ticket Thread
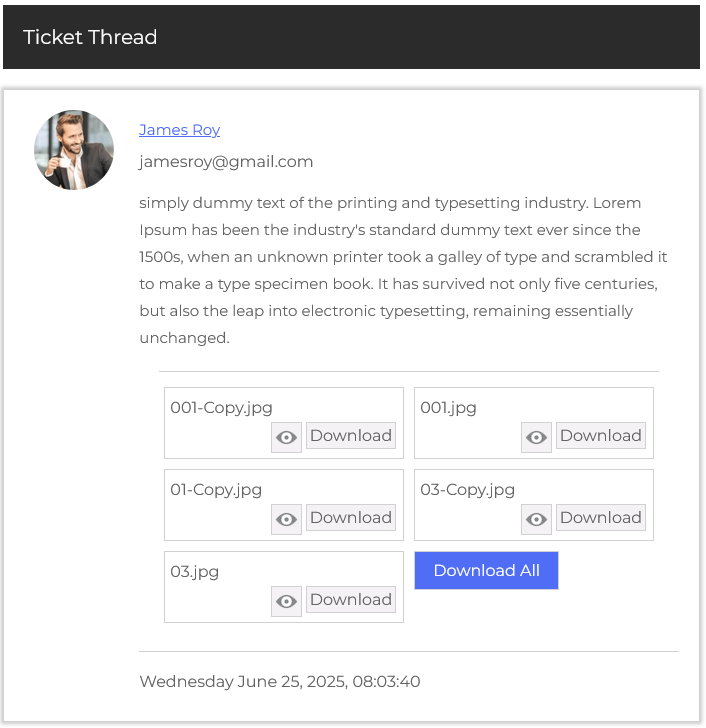
This section shows the conversation history between the user and the support team in a threaded format. Each reply shows the sender’s name, profile picture, role (user/admin/agent), message, and timestamp. File attachments, such as screenshots or error logs, can also be previewed and downloaded.
Role-Based Replies
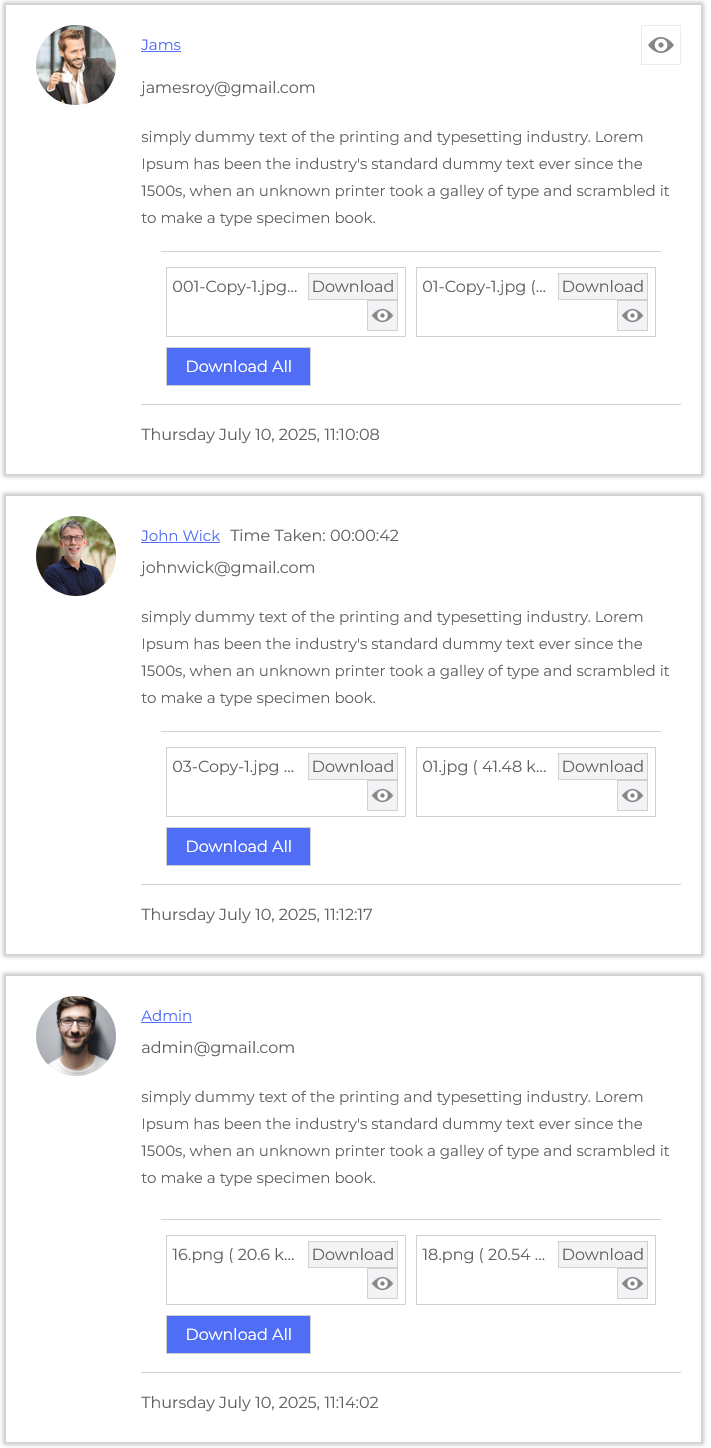
Replies are clearly labeled to show whether they were made by a User, Admin, or Agent, with styling that separates each role. This distinction adds transparency to the conversation, helping the agent see the last responder and determine the next required action. Each role also has access to slightly different tools and actions relevant to their permissions.
Attachment Handling
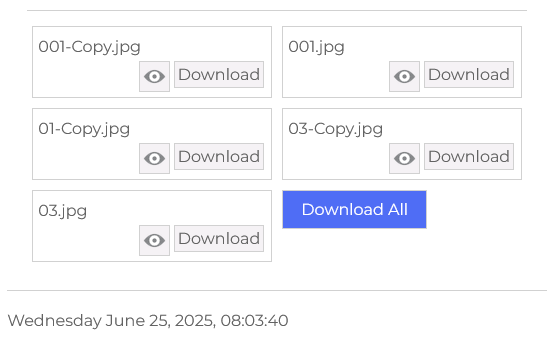
Within both the thread and reply sections, files can be attached and downloaded easily. Each message that includes attachments displays them in an organized list with file type, name, a view button, and a download button. This is especially helpful when troubleshooting issues that involve screenshots or documents.
Ticket Metadata Sidebar
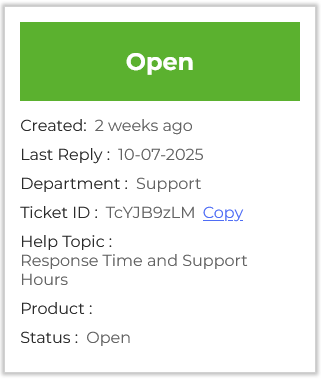
On the right-hand side, the sidebar shows quick ticket meta-info such as ticket status, created, last reply, help topic, product, ticket department, ticket ID, and ticket status.
Status
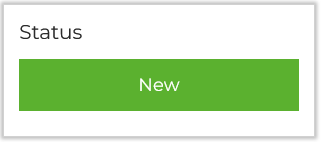
The Ticket Status feature in your help desk plugin is a crucial tool for tracking the progress of each support request from submission to resolution. It allows users to easily understand where a ticket stands at any given time by assigning it a clear status label such as Open, Waiting Reply, In Progress, Replied, Closed, or Closed due to Merge.
Status changes can also be automated based on ticket events. For instance, if a user replies to a ticket that was previously marked as “Replied,” the system can automatically “Reopen” the ticket by changing the ticket status.
Priority

The Ticket Priority feature in your help desk plugin allows you to assign a level of urgency to each support ticket, ensuring that critical issues are addressed quickly while less urgent matters are handled appropriately. By categorizing tickets into priority levels such as Low, Normal, High, or Urgent, the support team can manage workloads more efficiently and deliver faster response times where they matter most. You can set your ticket priority during ticket creation.
Ticket Assign and Transfer
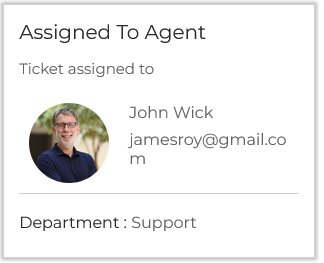
The Ticket Assign feature makes it clear who is responsible for resolving each issue. Assigning tickets helps prevent confusion or duplication of effort and ensures that no ticket is left unattended.
The Department Transfer feature makes it clear which department is responsible for resolving the issue. You can set your ticket department during ticket creation.
Post Reply
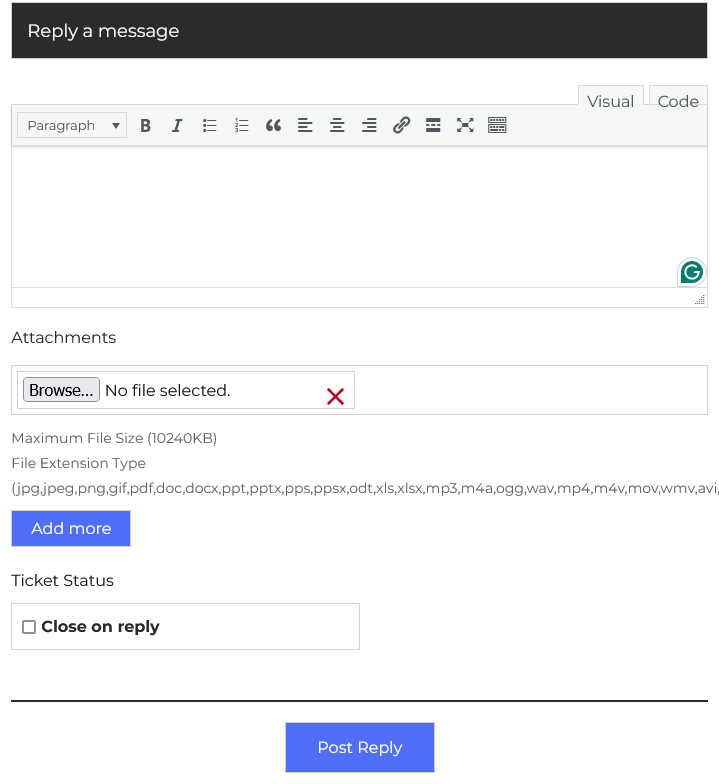
The Post Reply feature in your help desk plugin allows you to send responses directly to the admin and agent within a ticket thread. It is the primary way to communicate with the support team, address their questions, provide solutions, or request additional information. Each reply becomes part of the ongoing conversation history. For example, if a user reports an issue with their login credentials, the agent might reply with:
“Hi James, thank you for reaching out. Please try resetting your password using [this link]. Let us know if the problem continues.”
Type Message
- In the Response field, replies can include rich text formatting, file attachments, and links to help work faster and maintain consistency.
Attachments
- The interface also supports file attachments, which are crucial when sending logs, screenshots, or documents. Multiple files can be added using the “Add More Files” button, and supported formats are listed (e.g., PDF, DOCX, PNG, MP4, etc.).
Ticket Status
- Before posting the reply, the Ticket Status control allows the user to close the ticket automatically after replying by selecting “Close on reply.” This is helpful when the user is confident that the issue is resolved.
Once everything is ready, clicking the green Post Reply button will send the message, update the ticket thread, and perform any selected actions like changing ticket status.